Notes on K2 Inline functions
Yesteday I tweeted about inline functions and how to get your Icon working properly.
Appart from all the info in Johnny’s blogpost, there are some other catches as well. Just because i keep forgetting them, here’s a mental note to myself.
It’s a normal class library
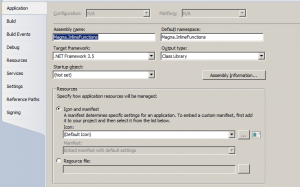
Start your project with a normal .NET class library. Make sure it’s .NET 3.5. Add references to the following files:
- SourceCode.Framework
- SourceCode.Workflow.Functions – this one isn’t always needed.
- SourceCode.Workflow.Functions.Design
- System.Drawing
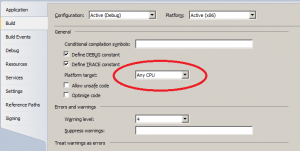
Another thing you have to make sure is the platform type. Make sure you set it to Any CPU. Here are my Project settings:
Make sure you sign the assembly as well!
The PNG Icon itself
The icon itself is a 16x16pixel PNG file.
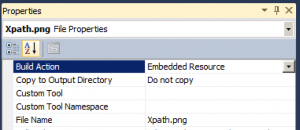
Something that a lot of people do wrong is add it via the resource configuration page (if you double click on Resource.resx). You do not need to do this, you can simply add the file to a folder called resources and change the properties of the file to ‘Embedded resource’.
Deployment
K2 has multiple designers and for that reason requires the assembly to be placed in different locations. In general, deployment is as follows:
- K2 Server – Copy the assembly to the Host Server\bin folder of your K2 installation.
- K2 Designer for SharePoint – Copy to the GAC of the SharePoint WFE. The image should work if you copy the PNG to “12(or 14)-hive\TEMPLATE\LAYOUTS\WebDesigner\Images\Functions”
- K2 Studio/K2 designer for SharePoint – Copy the assembly to the “Bin\Functions” of the K2 installation directory.
More info?
Together with this info and Johnny’s blogpost, plus the k2 manual, you should now be able to create your perfect inline function! If you still have questions, feel free to comment!


