K2 and jQuery: Creating a simple Worklist
With the release of K2 Services in the 1290 release, we’re able to get all sorts of data using RESTful services. These services provide output in 3 formats:
- XML
- ATOM
- JSON
XML is the default output. ATOM is a feed-style output which is in essence XML. And JSON is the one we’re going to use. JSON output can be seen as the serialized output of a JavaScript object. This makes it very easy to use in JavaScript and especially jQuery.
The out format is specified by the $format parameter in the querystring. An example:
http://dlx:81/K2Services/syncREST.svc/Task/Items?$format=JSON
The query-string is behind the ‘?’ (question mark) of the URL. The $format is the actual parameter. If you’ve never seen this, you might think the $ (dollar sign) is wrong, but it is suppose to be there and is complies with OData specifications.
Fiddler for your initial test
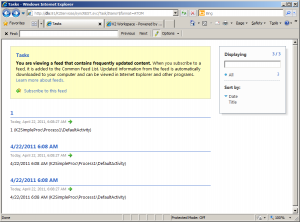
If you go to the URL in your browser, you’ll probably get a download dialog. This is normal because your browser can’t do anything with the JSON type of files. The ATOM format will likely be rendered in a fancy page like this:
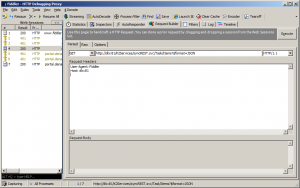
To get a view of the JSON, it’s easier to use Fiddler2. Use the request-builder to build a request:
If you get an authentication issue, you’ve probably forgotten to check the “Automatically Authenticate” checkbox on the Options tab of the Request Builder:
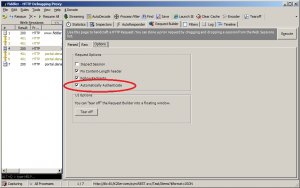
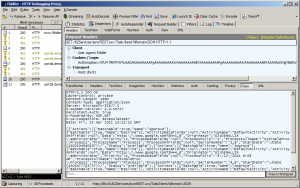
Now, hit execute and wait for the reply. After that, double click the reply on the left side and go to the RAW tab. You’ll see this:
That validates that you’re JSON response actually works. If it does not, it probably has something to do with authentication and your configuration file. Consult the excellent documentation.
When I was testing this, I got this error: “ReadResponse() failed: The server did not return a response for this request.”. This was fixed by changing the transport from “none” to “Windows”:
<transport clientCredentialType="Windows" />
Authentication
AJAX or XMLHTTPRequests have an extra layer of security. They check if the site that runs/provides the JavaScript also is the one being address in the AJAX request. This is done because a user doesn’t see what AJAX requests are made by the JavaScripts. This could lead to some data being posted to a different domain/url which is not what a end user expects and is a security problem.
Apart from this being annoying, different browsers also handle this differently, which makes it more complex and I personally think, it becomes very confusing to understand.
There is also an issue around basic authentication, this is because your initial request will get a 401 (unauthorized) response. jQuery doesn’t automatically send the second request. It would also have to ask for a username and password, which is weird if things happen in the background.
For this article, we’ll use MSIE 8 to make these security things a bit easier to handle, this is because it simply does integrated authentication, no basic auth needed. We’ll also just run the website from a local directory and not host it in IIS – although with the example, this also works.
Creating your worklist application
The example consists of these files:
- style.css – because we need a nice style
- worklist.html – the HTML code
- jquery-1.5.2.js – Important to get 1.5.2, it makes a difference
- worklist.custom.js – the javascript that we’ll be writing.
The files have a .txt extension so you can read them from your browser. You’ll have to rename them for local usage. The javascript also contain a simple “LogLine” function which can be useful for debugging.
Starting the script
jQuery has a nice ready() function, which you can use to see if the document is loaded correctly. This eliminates your script from running when all the DOM objects aren’t loaded. The small script calls the GetWorklistItem to actually start the AJAX call:
/* Get the worklist when the page loads */
$(document).ready(function () {
  LogLine("Page DOM loading done");
  GetWorklistItems();
});
The GetWorklistItems function calls the jQuery Ajax() method, which retrieves (and parses) the JSON result. As you can see, the URL is hardcoded in my case.
// We use a global tasks to save the result. This helps when clicking on an item.
var tasks;
function GetWorklistItems() {
  LogLine("Checking worklistitems...");

  $.ajax({
    url: 'http://dlx:81/K2Services/syncREST.svc/Task/Items?$format=JSON',
    method: 'GET',
    crossDomain: false,
    error: function (data, error, status) {
      alert(status);
      alert('Error, probably authentication.');
    },
    success: function (data) {
      tasks = data;
      BuildWorklist();
      AddRowClickEvents();
    }
  });
}
An important property is the crossDomain setting. This setting should be false by default, as per jQuery documentation, but if we leave it out, it doesn’t work. If you set it to true, it also doesn’t work. To me, it seems like a jQuery bug.
We handle the error and success methods. On success, the data is saved to the ‘tasks’ variable. In my script, that’s a global variable. I didn’t use object orientated javascript code, so this was a quick solution. We need it as a global variable, to be able to do something with the worklistitems after you’ve clicked on it. The BuildWorklist() fills the table with worklistitems:
function BuildWorklist() {
    LogLine("Cleaning up old tasks...");
    $('#Worklist tr').not(':first').remove();

    $.each(tasks, function (index, item) {
        var taskRow = "


  ";
          taskRow += "


    " + ConvertPriority(item.Priority) + "
  ";
          taskRow += "


    " + item.ProcessFolio + "
  ";
          taskRow += "


    " + item.ProcessFullName + "
  ";
          taskRow += "


    " + item.ActivityName + "
  ";
          taskRow += "


    " + item.Status + "
  ";
          taskRow += "
";
        $('#Worklist tr:last').after(taskRow);

        LogLine("Added SN = " + item.SerialNumber + " to worklist.");
    });

    LogLine("Worklist loaded.");
}
This takes the table we’ve defined in the HTML and adds table rows for each worklist item. As you can see, the JSON output is converted to an object which is then easy to use. There’s also a small ConvertPriority method, which changes the number into a nice string:
function ConvertPriority(item) {
  switch (item) {
    case 0:
      return "Low";
    case 1:
      return "Normal";
    case 2:
      return "High";
    default:
      return "Unknown";
  }
}
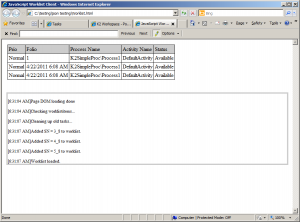
Test your application, if you did things correctly, it looks like this:
Opening the worklist item
Showing a worklist is pretty simple, but now we need to do something with it. In this example, the javascript code simply navigates to the URL of the worklistitem. This information is stored in the Data property.
The GetWorklistItem also called AddRowClickEvents, which looks like this:
function AddRowClickEvents() {
  $('#Worklist tr').not(':first').click(function (eventData) {
    $('#Worklist tr').not(':first').each(function (index, item) {
      if (item == eventData.currentTarget) {
        location.href = tasks[index].Data;
      }
    });
  });
}
Again a lot of jQuery things happening. It adds a click event to the table rows added to the table – that’s why we call AddRowClickEvents after we’re build the worklist. When an item is clicked, we try to find that item by matching the rows in the table and where we’ve clicked. The index of that item corresponds to the tasks array we saved earlier. Then it’s a simple location.href to the Data property to navigate to the correct page.
Conclusion
Considering the posibilities of jQuery, this is a simple example of what you can do when you combine jQuery and the REST services of K2. I hope this post was a good introduction to that.
